Pages

Showing posts with label Tutorial. Show all posts

Tuesday, August 7, 2012

Spice Organization

After many failed attempts to organize our spice cabinet, I finally had one last idea to try.  And if this didn't work, well then I was about ready to throw in the towel!  Our Spice cabinet was a mess.  All different size containers, multiple containers of the same spice (all half used of course), and not to mention the spices we bought in bulk that were still in their plastic baggies from the grocery store.

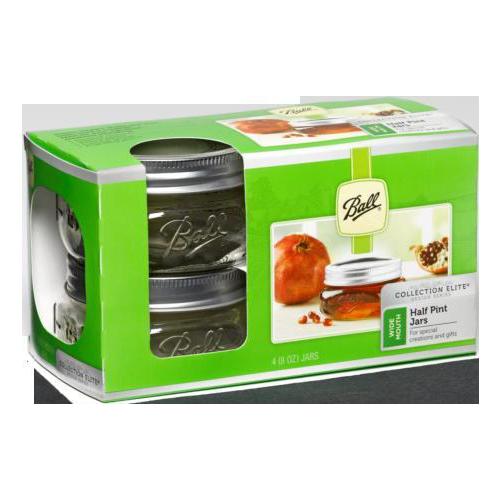
So, one day, while at Wal-Mart, I found these awesome little jars.
  
They come in a set of 4.  So naturally I cleaned out that Wal-Mart and bought 4 packs of them giving me 16 jars.  While there, I also picked up some chalkboard paint.


Since these jars were technically canning jars, the inside of the lid separated from the outer ring.  So I took off all of the lids, and separated out the middle section of the lid.  Then I painted all of the middle pieces with the chalkboard paint.  I did about 3 coats, waiting about a day in between each coat.


Once they were all dry, I hot glued the outer ring, to the middle piece of the lid.  I didn't want to have to keep dealing with two pieces of the lid every time I wanted a spice!  


And finally, I used a chalk pen (from Michaels in the Bridal section) to write the names of the spices on the jars.  I still need a few more jars to fill the drawer, but this seems to be a vast improvement over our previous  "system" if you can even call it that.  Finally I emptied our spices into the new jars, and voila!


This way we can see where all of the spices are, and we don't have to empty half of the cabinet to find the one we want!  These jars are also plenty wide enough to fit measuring spoons in there for recipes, and just as easy to get out a "pinch" of something to season with.  We love the new system, and it was totally worth finding a new home for our dish towels.

Tuesday, April 17, 2012

Homemade Laundry Detergent

I have seen this craze all over Pinterest lately.  And in my attempt to save us a little moolah, I figured it was worth a shot.  The “recipes” looked pretty safe and simple and I love the sense of accomplishment I have when I make something on my own. 

So, I found this pin on Pinterest and decided to use it as my guide.  I will say that I bought most of my ingredients on Amazon since we have Amazon Prime and the shipping is free…why not?  But I did buy the Oxiclean, the Borax, and the large 2 gallon jar at the store.  Here are what the ingredients look like (since I had never heard of washing soda or Fels-Naptha till now) and how much you will need of each:

4lb box of Baking Soda
4lb box of Borax
55 oz of Washing Soda (made by Arm n Hammer found in the laundry isle)
3 – 3.5 lbs of Oxiclean powder (I couldn’t find 3.5 pound containers, so I used 3 pounds)
3 bars of Fels-Naptha


So, the first thing we did was line a 5 gallon Home Depot bucket with a plastic trashbag. Then I dumped about 1/3 of each of the powder ingredients into the bucket. 

Then I used a cheese grater, and grated up the bars of Fels-Naptha one at a time.  It actually looks a lot like cheese, but it is much easier to grate. 


Then I threw that into the bucket with the powders.  And mixed that all up.  Repeat that until you have used all 3 bars, and all of the powder ingredients.  (I used my hand to mix it, just make sure you wash your hands before and after).  So then you should have a powder mixture that looks like it has bits of cheese in it! 

The technique we used to get it in to the container was to lift the bag out of the bucket, and cut off one of the corners of the bag and let it empty into the container.  And voila!  There you have homemade detergent! 

It works great in our HE front loader washer, I just place the detergent directly into the drum instead of in the compartment.  You only need 1-2 tablespoons per load.  And it really has no scent at all.  I’ve read where you can add essential oils or fabric softener crystals to the mix to make it smell better, but we prefer the no-scent route.  And all these basic ingredients are great for sensitive skin.  It was a win-win for us and I know it’ll save us money over the year because of how long it lasts!

DIY Jewelry Shelf


So this project has been sitting on the kitchen counter for about 3 weeks.  And now it has been hanging on my wall for about 2 weeks and I love it.  It’s so simple and clean and gets rid of clutter!  I love how great it matches with my earring holder and I love that the colors were totally customizable.  I opted to stick to mostly white just because I like that light airy feeling it has.  But I added a little sum’n sum’n with the gray knobs.  Looking back, I probably should have gone with a longer shelf, but I suppose I can always change it out later, or just move things around and add a second one!

Ok, so the process was super simple. I went to Home Depot and bought a plain white shelf that came with the supports.  I got the all in one package instead of choosing the shelf separate from the supports. 

Then, I used a piece of scrap wood that I had left over from our closet makeover a while back.  The hubs cut it down to size for me so that it fit in between the two supports at a 90 degree angle from the shelf.  This is where we screwed the knobs in.  After I spray painted the knobs, and we screwed them in, it was ready for installation! 


I had the hubby hang it just below my earring holder with enough space for my large chunky bracelets to sit on the shelf.  I love the way it looks and how little space it takes up.  And now all of my jewelry is so accessible, so I have no excuse not accessorize!  I’m excited to make another one so that I have a spot to put all of my “stud” earrings and more delicate necklaces.  


Saturday, March 24, 2012

Organized Earrings


So I know I have been majorly slacking when it comes to posting.  And I wish I had an excuse for it...but alas, my only excuse is that I've become super engrossed in my Harry Potter books during my free time!  I'm currently on book 6 and almost half way through with it.  So bare with me as I finish the series!

But for now, I do have a jewelry organization DIY project to share with you.  I've decided that keeping all my "fashion" earrings in a drawer is just not convenient at all.  I never remember what earrings I have, and they always get all tangled together.  And normally my mornings are one big rush so I don't have time to go rummaging to find earrings to go with my outfits.  So I've seen this simple idea floating around Pinterest lately and I really wanted to try it.

So I went to Home Depot and bought one long piece (96 inch) of moulding.  Hubby and I measured it out (ok so this was mostly him, but I watched and finally learned how to use the saw!) and cut the 96 inch piece in to 4 equal pieces.  We cut the ends at 45 degree angles.
NOTE: You could always just go buy a frame and take out the backing a glass. But I thought it would be fun to try totally from scratch.

The piece came unpainted, so I just slapped a couple coats of white spray paint on there.


Then using some Gorilla Wood glue
I glued the four pieces together.  I had to use some Irwin Quick Grips to hold the pieces together, otherwise I would have had to hold two pieces at a time together until they dried enough.

While at Home Depot, we also picked up some insect screen material

I unrolled that and hubby used a staple gun to tack it down to the frame.


Once it was pulled tight, and stapled all the way around, I cut off the excess

And voila, this is what I ended up with!

We attached a simple picture hanger to the back of it, and stuck it up on the wall.  And it soon became this beauty

Now all my "fashion" earrings are out on display in all of their loveliness!  I love being able to see them all so clearly.  And all of the pairs are not jumbled up together.  It ended up being a great way to spruce up a blank wall and organize my jewelry!  I have plans to add a shelf underneath with some knobs for necklaces.  I will *hopefully* be working on that this weekend.  So I should have another post for you quite soon!

Wednesday, March 7, 2012

Upcycle Crafts


I'm trying to catch up here, so yes, you get two posts in one day.  Another small project I worked on this weekend was upcycling some old wine bottles.  I have saved a few over the past few months and finally decided to get on it and actually use them.

Since I had already washed them out right after we finished the wine, that part was done.  I took the bottles upstairs and wrote on them with my hot glue gun.  I didn't remove any labels and I think they turned out fine.  I made sure that my words were within the label, so after it was spray painted, it somewhat looked like a little frame around the words.  Make sense?

Unfortunately I didn't get any pictures of the bottle with just the glue and no paint.  But here is one of the bottles after one coat of white spray paint.

And here they are after they have been coated 3-4 times (sorry for the less than stellar pictures).

My plan for these beauties is to make a few more coffee filter flowers died with food coloring and use them as decoration on the dresser in our master bedroom.  I even like them so much, I might try to make a few more to go above the cabinets in the kitchen.  Maybe I'll even try something other than white :-)

Stay tuned for some other fun crafts I have in progress!

Wednesday, February 15, 2012

Simple Pillow Case Tutorial

Hello blogland! Over the weekend I made a few new pillow covers for the couch pillows we keep downstairs in the den/living room/family room/whateveryoucallit room.  I've probably mentioned this before, but I've decided to start changing up the color scheme in this house hold.

I blame Pinterest.

Our current colors are reds, browns, beige, and sage green.  However, I've decided I want to switch things up in here.  I'm going for more of the whites, beiges, teals, greens, blues...can ya dig it?? Yes, I’m trying to bring back sayings from previous decades…who’s with me?

Ok, anyways, on to the pillow cover.  I got the original idea from Thrifty and Chic.  You should check out her site, she’s got an amazing eye for design and is so incredibly resourceful! 

Here we go.  Materials you’ll need:

Fabric

No, seriously, other than a sewing machine, that is all you will need.  You’ll need fabric that is about 2 inches wider than the pillow you are covering, and about 2.5 times longer.  Here is the piece I started with.

I believe I got 2.25 yards of each type of fabric I was using, and that was enough to cover 4 of my pillows. 

Step 1: Lay the fabric out face down.

Step 2: Fold up the edge along the short sides about a half inch to an inch. 

Step 3:  Sew those edges

Step 4:  Lay the fabric out face up and place the pillow on top


Step 5:  Fold the bottom half of the fabric up over the pillow and put a pin about where that bottom crease should be

Step 6: Remove the pillow, and fold down the top to where it is over lapping the bottom half by about an inch and a half.  Then lay the pillow back on top to make sure that it will still fit after you’ve sewn it.  Just a note to remember, pillows squish, so if it looks like it’ll be a bit of a tight fit, that’s ok.  It just means that you won’t have a bunch of excess fabric around the edges.

Step 7:  Sew the sides of the pillow case shut.  I only sewed on the left and right sides.  You can sew all the way around if you want, but it’s not necessary.

Step 8: Turn right side in and stuff that pillow inside!  Feel free to do a top stitch here if you want to add a little border.  I didn’t on these, but I may on future covers.

Simple right?  Great way to totally transform the look of some tired old pillows. 

Don’t forget to link up with Jaime over at Crafty Scrappy Happy for her HUGE 1 Year Blogiversary Link Party!!  See my previous post J 

Happy Sewing!